In this post, we will learn how to design the Wheel Rim of a car using Solidworks software. In order to design a proper wheel rim, we have selected a wheel rim of Aston Martin One-77 car.
Aston Martin is a two-door, two-seater flagship sports car built by British car manufacturer Aston Martin.
You can find more about this car on google.
Our purpose is to design a simple, good and rigid wheel rim. So, without wasting our time lets start designing wheel rim.
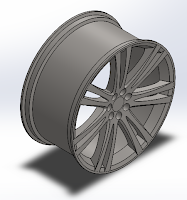 |
| Wheel Rim |
How to Design Wheel Rim?
In this post, we are going to see how to design a wheel rim using Solidworks.
- Open SOLIDWORKS, go to File > New.
- Select the Part icon and click ok.
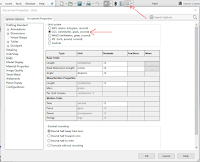
Now before starting drawing, we need to assign units. We are going to design a wheel rim in CGS (Centimeter, Gram, Seconds) system.
- Click on the Options (gear like icon) at the top of the screen.
- Go to the Document Properties tab and click on Units.
- Check the CGS system and click OK.
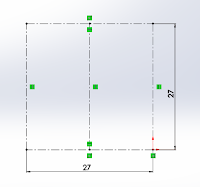
- Start a new sketch on Front Plane.
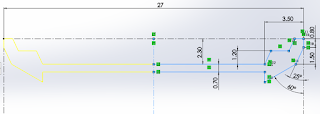
- Draw a set of construction lines creating a square and draw a vertical middle construction line as shown and give dimensions.
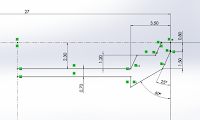
- Now, draw a set of Lines and dimension them.
Make sure you use relations such as equal and parallel to avoid overloading of dimensions.
- Mirror these lines using the Mirror Entities tool in the sketch ribbon.
- Exit the sketch.
- Click on the Revolved Boss/Base tool in the Features ribbon.
- Select the lower construction line of the sketch as the Axis of Revolution and Validate.
Now, we will design the rim pattern. As you can see in the first photo, the pattern repeats 7 times.
We will be designing a single pattern and repeat it 7 times using Circular Pattern tool.
Make the previous sketch visible.
- Start a new sketch on Front Plane.
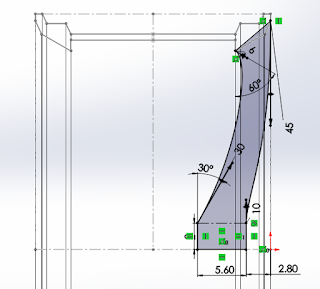
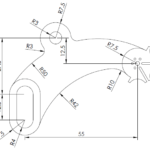
- Draw a set of Lines and Splines and dimension them so.
Note that the splines drawn are two-point splines. Make upper right spline handle vertical.
The vertical line at the bottom is 3cm (Dimension is got hidden due to constraint at left).
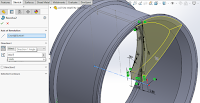
- Click on the Revolved Boss/Base tool in the Features ribbon.
- Select the lower line as the Axis of Revolution.
- We want 1/7th of the total revolution. Dimension it so as shown in the figure below and Validate.
- Start a new sketch on Right Plane.
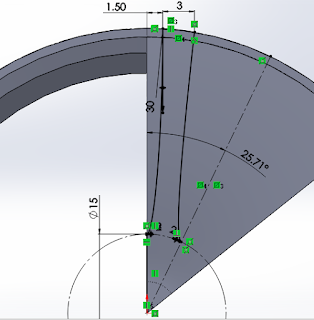
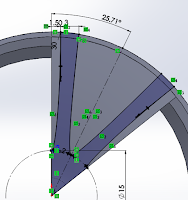
- Insert two Circles starting the center from the origin and convert them to construction circles.
- The outer circle should have Coradial relation with the perimeter of the Rim’s base cylinder.
- Set the diameter of the inner circle as 15 cm.
- Add a construction line in the middle and set its angle to 360/14 as shown.
- Draw two Splines going from the outer circle to the inner circle. Make the top left handle of the far-left spline vertical, and its bottom handle horizontal.
- Make the bottom handle of the second spline perpendicular to the construction line in the middle.
- Draw a vertical line from the origin to the inner circle.
- Draw an arc on the top of the sketch that closes two splines.
- Now, mirror these using the Mirror Entities tool with respect to the middle construction line.
Exit the sketch.
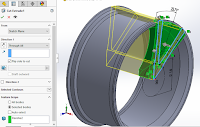
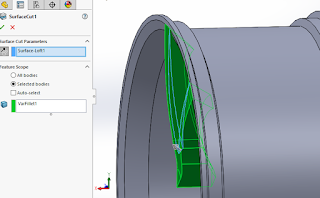
- Select the sketch and click on the Extruded cut tool in the Features ribbon.
- Make extrusion to Through All.
- Tick Flip side to cut.
- Select the relevant body in the Feature Scope section.
Validate.
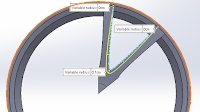
- Now, go to Insert > Features > Fillet/Round and set fillet mode to Variable size.
Select inner edges and apply radius as shown. - Validate.
- Go to Surface > Insert > Loft.
In direction 1, right-click and select the selection manager.
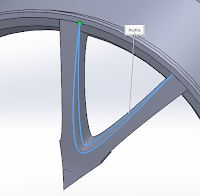
Select the two profiles as shown below, which corresponds to the edges of the previous fillet.
Validate.
Select this lofted surface from the Features Manager.
- Go to Insert > Cut > Cut with Surface.
The direction of the cut should be pointed outward as shown in the figure.
Validate.
- Go to Insert > Features > Delete/Keep Body.
Delete the surface loft body from the model.
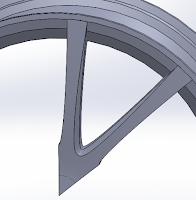
Here is how the variable chamfer looks.
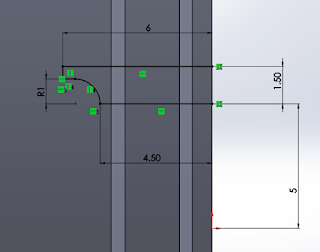
- Start a new sketch on Front Plane.
- Add the Lines and arc and dimension them as shown.
- Exit the sketch.
- Click on Revolve Boss/Base tool and revolve the sketch with the line of 4.5 cm as Axis of revolution.
Don’t forget to Untick the Merge Result. - Go to Inset > Move/Copy.
Select the revolved body we just built.
Put the values as shown in the figure.
Validate.
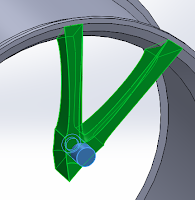
- Go to Insert > Features > Combine
- Select Subtract operation.
Choose the main body to be revolved pattern (shown in green) and the body to remove the revolved cylinder (shown in blue).
Validate.
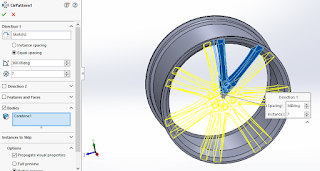
- Now, go to Insert > Pattern/Mirror > Circular pattern.
Put the entities as shown in the figure and validate them.
- Go to Insert > Features > Combine
- Use add operation and select all the solid bodies of the rim.
Here is how your final design should look like.




I’ve had such a good experience using CMS IntelliCAD and find it to be one of the best CAD software out there. It was so easy for me to start working with it as it offers all the CAD tools that I am aware of to understand whether it’s worth it, and the special offer by CMS came as a nice surprise. Definitely recommended on my part! ready familiar with. I got a free trial right upon registration. It was great as I was able to work with the software.
wonderful content thanks for sharing