Table of Contents
First Angle Projection and Third Angle Projection Methods
A collection of 2D drawings of any 3D object is represented with the help of orthographic projection. The orthographic projection consists of 6 views (Front, Back, Top, Bottom, Right, Left) called as principle views.
Among these six orthographic views front view, right view, and top view are the most commonly used to represent the orthographic projection of any object.
Method of Projection
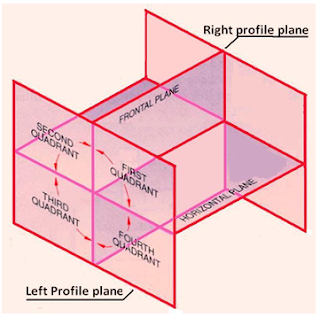 |
| Fig. 1. Principle Projection Planes and Quadrants |
What is First Angle Projection?
 |
| Fig.2. An object in between Plane of projection and observer |
As explained above, in the first angle projection, an object is placed in the first quadrant.
The views are obtained by projecting the image of an object in the respective plane. Here you have to note down that the right-hand side view is projected on the plane placed at the left of the object.
After projecting the images on the respective planes, the bottom plane and the left plane is unfolded onto the front view i.e. left plane is unfolded towards the left side to get Right Hand Side view on the left side of the front view.
Similarly, the bottom plane is unfolded towards the bottom to obtain the Top view placed below the front view as shown in fig. 3.
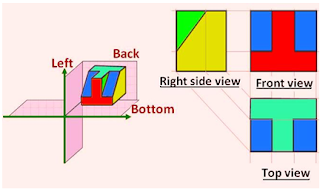 |
| Fig.3. First Angle Method |
What is Third Angle Projection?
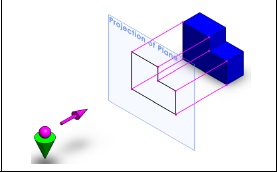 |
| Fig.4. Plane of projection in between object and observer |
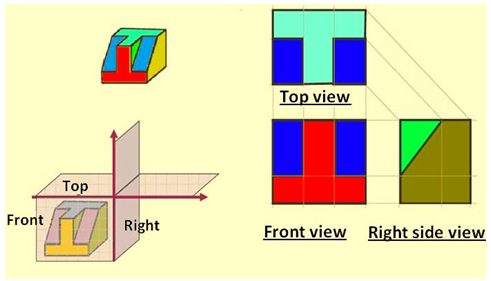
 |
| Fig.5. Third Angle Projection |
Symbols of First Angle Projection and Third Angle Projection
 |
| Fig.6. Projection Symbol |
First Angle Projection Symbol

Third Angle Projection Symbol

Difference between First Angle projection and Third Angle Projection
| First Angle Projection | Third Angle Projection |
| The object is imagined to be in the first quadrant | The object is imagined to be in the third quadrant |
| The object lies in-between the plane of projection and observer. | The plane of projection lies in between the object and observer. |
| When views are drawn in their relative position, Top view comes below Front view, Right hand side view is drawn to the left side of the elevation. | When views are drawn in their relative position, Top view comes above Front view, Right hand side view is drawn to the right side of the elevation. |
| Is followed in India and European countries. | Is followed in American countries. |
 |
 |
 |
 |
 |
 |



Thanks for finally writing about > First Angle Projection and Third Angle
Projection Methods < Liked it!
Wow! Finally I got a webpage from where I can genuinely get
valuable information regarding my study and knowledge.